Showing posts with label Review. Show all posts

Tuesday, 14 May 2013

Born Pretty Store - Wax Rhinestone Picker Pencil

I have another Born Pretty Store review for you today.
At the same time as I received the Nail Stud Wheel I reviewed yesterday I also received two white wax pencils.


You probably have a fair idea of what these are used for but for those of you who don't, no I have not lost my mind, and yes this is nail art related.


They are used for picking up rhinestones/studs/glequins/etc and placing them on the nail.
I used to use an orange stick dipped in clear nail polish to pick these fiddly things up and while that did work fine, I much prefer using the wax pencil.


These make short, mess free work of picking up and individually placing glequins etc, so if the thought of spending several frustrating hours faffing around with rhinestones puts you off experimenting with them then I highly recommend trying these out. They'll last you a while and are a great basic to have in your nail art arsenal.
You get two for $1.99 HERE with free worldwide shipping. you can also use the code QPL91 for 10% off anytime.


♥ A ♥

Monday, 13 May 2013

Born Pretty Store - Nail Stud Wheel Review

Hey!
Sorry to have been gone so long.
I took a bit of an unexpected break from blogging for a few reasons, just one of which being that all my nails decided they were going to break off and look terrible so I needed to give them a bit of a break. I took the time off to work on a couple of other things too but now my nails are back in fighting form I am so glad to be able to do my nails and blog again.

Today I have a review for you.
A while back I received this Nail Stud Wheel from the Born Pretty Store to review.


I love anything with studs so I could not wait to experiment with these!
As you can see there are 12 sections each holding a different stud making it ideal if you are yet to try nail studs. There are plenty to play with in each section, and I love that there is a mix of Gold, Silver and Black studs in there along with different sizes and shapes.

I wanted to do something to show as many of the different types of studs as I could get away with in one design and here's what I came up with.


I used Barry M Gelly Effect Lychee and Barry M Black for the nail art then applied a coat of Barry M All In One Basecoat/Topcoat/Nail Hardener over the top and applied the studs while that was still wet. Once they were all in place I let them dry for a little while then finished with a coat of China Glaze No-Chip Top Coat.

The studs lie quite flat to the nail and aren't too big which helps them last longer on the nail without catching on anything, mine lasted a full three days before I lost the first stud.
I have been so impressed with this little wheel of wonder that I have used studs in almost every design I've done since they arrived, so expect to see a lot more of them!

You can buy your own Nail Stud Wheel on the Born Pretty Store website HERE for $4.89 plus free worldwide shipping and you can use the code QPL91 anytime for 10% off.


♥ A ♥

Tuesday, 29 January 2013

Glitter Tips Gleeq Week - Day 2 Glequin Gradient


It's Day 2 of 'Gleeq week' and today I have a Glequin Gradient to show you.

If you missed yesterdays Glequin mani and my review of the Born Pretty Store Glequins you can see that HERE.


This was so tricky to photograph!
Hopefully you can get the idea from the pictures though.
I've used two coats of Barry M Matt White as a base and positioned the Glequin gradient across the middle of the nails. I also tried to give the effect of it fading out to the top and bottom of the nails too if that makes any sense at all!?
Starting from the thumb the colours are Red to Orange, Pale Pink to Pale Lilac, Dark Blue to Turquoise, Dark Green to Lime Green, Pale Green/Gold to Silver.

You can purchase the Glequins from the Born Pretty Store HERE for $6.45 with free delivery and you can get 10% off using the code QPL91 which is also in my side bar!

I hope you have enjoyed Day 2 of 'Gleeq Week' and see you tomorrow for Day 3!

♥ A ♥

Thursday, 22 November 2012

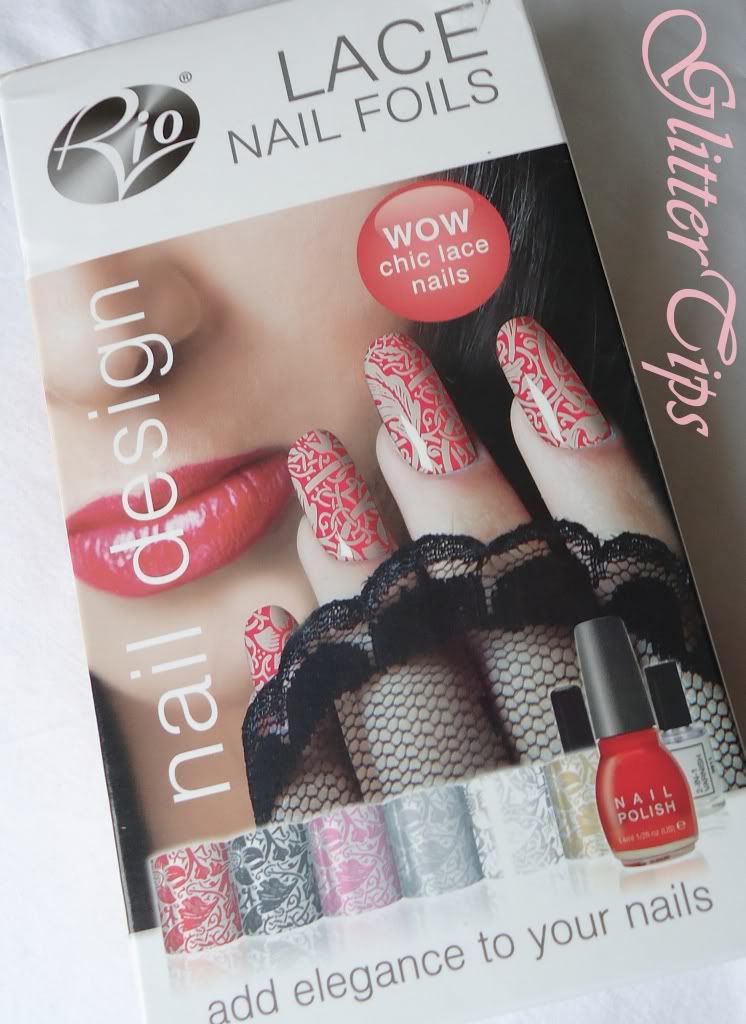
Rio Beauty - Lace Nail Foils Kit Review

A couple of weeks ago I was very kindly sent another one of the Rio Beauty Nail Art Sets to review.
This time I was sent the gorgeous Lace Nail Foils which I have been having a lot of fun with!


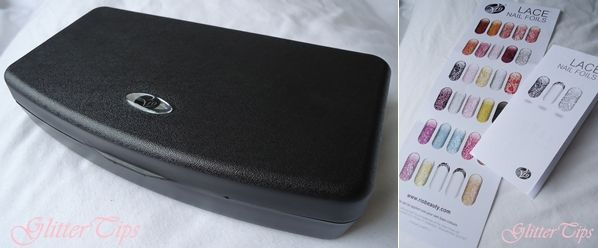
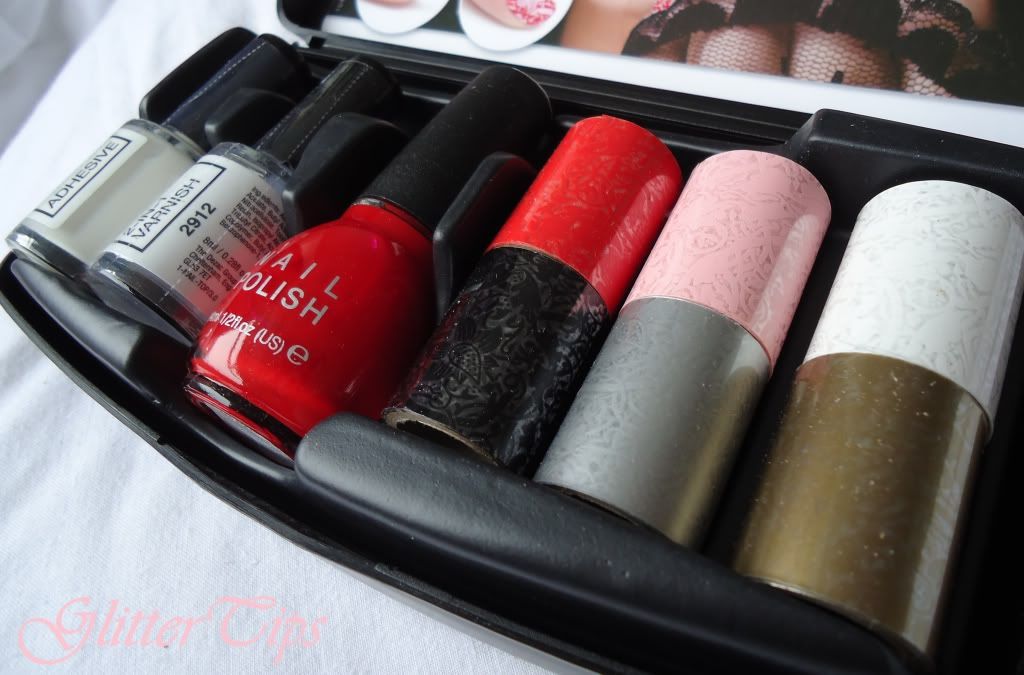
The kit comes in a little black case which contains- 

1 x 8ml bottle of Foil Adhesive.
1 x 8ml bottle of 2 in 1 Varnish.
1 x 14ml bottle of Red Nail Polish.
6 x rolls of Lace Nail Foils in the colours Black, White, Gold, Silver, Red and Pale Pink.
Application stick.
Design Chart.
Instructions.


They are really very simple to apply and the instructions are clear and easy to follow.
First of all you need to cut the foil into little strips wide enough to cover your nail.
Then apply your chosen nail polish to clean, dry nails and leave to dry for at least 30 mins.
Next apply the adhesive, and wait for 10 mins.
Place the foil strip over your nail and use the application stick or a cotton bud to rub over the foil to ensure it sticks and to smooth out any creases.
Gently peel the foil off and seal with 2 in 1 Varnish, remembering to cap the free edge.

A few problems that I did come across were- 
The pattern not sticking in places, which is easily fixed by just reapplying the adhesive and patching it up.
 Creasing was a bit of a problem but I wouldn't say that was the kits fault, I do have rather curved nail beds making creases inevitable and it is only noticeable if you are really looking at them. 
Sometimes my base colour peeled off, but that was my own fault by trying to guess how long the nail polish was drying for and applying the foils way too early, the obvious way to avoid this is to actually pay attention to the time when applying and make sure you wait the 30 mins for the nail polish to dry, possibly a little longer, and the 10 mins for the adhesive to dry. Once I started paying attention rather than guessing the application was easy peasy!
Wear an tear was a bit of a problem too, the 2 in 1 Varnish is not going keep these looking good much longer than a day, you need to apply a harder wearing top coat after the 2 in 1 Varnish to protect them. If you want them to last a week or more I'd advise reapplying your topcoat every couple of days and make sure you cap the free edge.
Other than those few niggles I really liked them!

I first tried the Black Foil over the Red Nail Polish that comes in the kit and was very impressed!
The Red Nail Polish applies really well, I was happy to leave it at one coat which is rare for me, and a bonus time wise.


I wore this combination on a night out and got lots of people grabbing my hands to have a closer look and saying how great they were. 

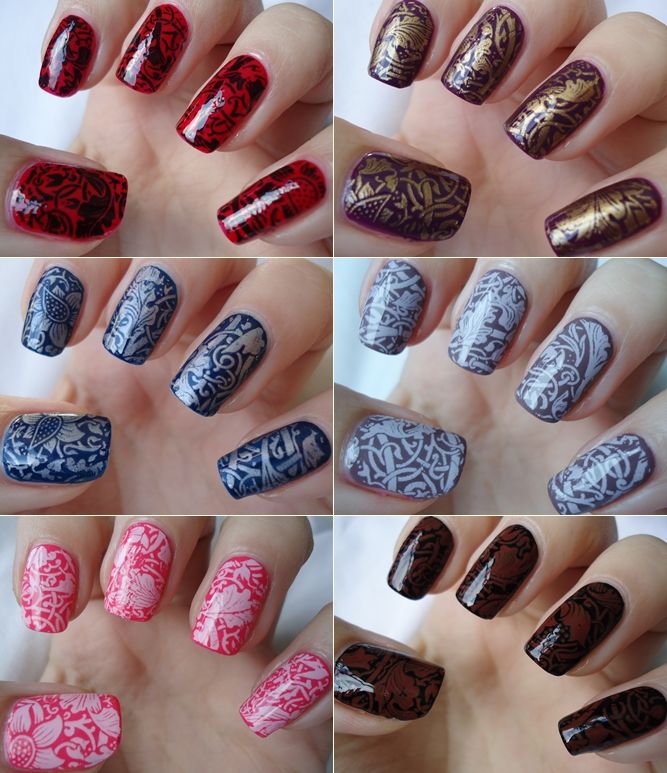
Other combinations I tried were-
Gold over Barry M Gelly in Plum.
Silver over Barry M Gelly in Blue Plum.
Pale Pink over Barry M Cappuccino.
White over Barry M Gelly Grapefruit.
Red over Barry M Black.


As you can see they are quite stunning and with all the possible colour combinations they are perfect for nights out, weddings, parties, New Years and Christmas.

The kit costs £29.99 which I think is good price when you consider what you get in the kit and how many manicures you could get from it. Another potential Christmas gift from Rio Beauty!

♥ A ♥

* Disclaimer: This product was sent to me for review by Rio Beauty. Everything you read here is my honest opinion of the product after trying it out on myself. *

Tuesday, 16 October 2012

Rio Beauty - Marble Nail Art Polish: London Collection - Review

If there is one nail art technique I struggle with it's water marbling.
Freehand? No problem. Stamping? Tricky at first but got the hang of it after a few tries. Foils? Love it. But water marble vexes me. I have tried many times following various tutorials and with all different types of polish but have not for the life of me been able to get it to go right!
So I gave up, until now.


I know they are not a patch on some of the phenomenal water marble nail art designs I've seen elsewhere but I did it! A whole water marble mani! 
And it was all thanks to the little box of magic after the jump.

Friday, 12 October 2012

Models Own - Hayley's Comet - Swatch and Review

The moment I saw this polish on Twitter I went straight to the Models Own website and ordered it.


Then as soon as it arrived, I put it on my nails!


This is Models Owns newest addition to their duo-chrome collection, Beetle Juice.
It is a difficult shade to describe, to me it's copper with a green/gold duo-chrome shift, with the occasional, very subtle flash of blue/purple. The duo-chrome is more apparent in the bottle than it is on the nail which might be disappointing to some but I like that about this polish. In some lights the duo-chrome makes the colour look almost like a shimmery taupe/nude shade. 
Very pretty!


It's such a lovely Autumn shade for days when you just don't fancy wearing a dark colour on your nails, or if you're just not into the darker nail polish shades.

The application was lovely as you would expect from Models Own, you can see the odd brush stroke but I only noticed because I looked for it, which let's face it, no normal person would actually do!
I have two coats of Hayley's Comet with one coat of Seche Vite on in the photos. I could still see nail line in some lights but one more coat would sort that out if visible nail line is something that bothers you. We all have our pet peeves!

(Direct Sunlight)


I'm really quite taken with this polish, it's not like anything else in my collection, which is always a relief!

You can purchase this little beaut on the Models Own website HERE for £5, or if you like your duo-chromes and have not yet got any of the other Beetle Juice shades then I suggest you grab the box set HERE for £20, you won't regret it! I've also heard that some people have seen Hayley's Comet in their local Boots store also for £5.

♥ A ♥

Sunday, 12 August 2012

My Three Must Have Hand & Nail Products.

As a nail fanatic, it is my firm belief that everyone needs a good hand/nail care routine, with products they trust and that work well for them. After all, our hands take quite a beating on a daily basis, so they need all the TLC they can get.
I thought as a bit of a change I'd show you some of the products I use and love and will happily hand over my money for again and again.

First off is my Leighton Denny Crystal Nail File.


I have the small, but it also comes in large or you can purchase both in a set.
This nail file calls itself the 'Rolls Royce of Nail Files' and I have to agree. It has won awards for it's brilliance. Apart from being more pleasing on the eye than your average nail file it is also better for your nails. It 'simply turns your nails to dust' leaving a beautifully smooth and sealed free edge. Because of this you can break all the nail file rules and file in which ever direction you please, even back and forth, which is a big no no with your usual emery board.
The surface of the file comes with a lifetime guarantee, so as long as you take good care of it you should never need another nail file again. The small version comes in an aluminium case so you can pop it in your handbag without having to worry about it getting broken or damaged in anyway and cleaning it is as simple as running it under warm water.
It says it helps with peeling and splitting which is one of the reasons I bought it,
I'm fairly certain this file has, along with a few other products, been the solution to my problem with peeling and splitiing nails. I completely adore it and can't see myself even looking at another file ever again.

Next is my CND Solar Oil.


I have tried dozens of cuticle oils, balms and creams but nothing has lived up to this little bottle of loveliness!
Another multi award winning product. It is a blend of Sweet Almond oil, Jojoba oil and Vitamin E which 'deeply penetrate and protect nails and cuticle area'.
This is another product which I hold responsible for improving the state of my nails. Just like any other cuticle oil you apply it to the cuticle and massage it in to the cuticle and surrounding skin, I try to apply mine every evening.
The list of ingredients are - Prunus Amygdalus Dulcis (Sweet Almond) Oil, Simmondsia
Chinensis (Jojoba) Seed Oil, Oryza Sativa (Rice) Bran Oil,
Parfum (Fragrance), Tocopheryl Acetate (Vitamin E).
Solar oil is a pleasure to use and leaves my cuticles feeling wonderfully soft and conditioned. I like to use it like a bit of a nail treatment in winter by applying it generously to each nail then soaking them in warm water for a few minites. This makes the cuticle super soft and in perfect condition to be gently pushed back using a cuticle pusher.
Love, love, love.

For hand cream I used another CND product.
The Almond Hydrating Lotion.


I was actually given this by a friend who bought it in a local nail salon. The link I have provided is to an eBay seller who I have never used personally but has a 100% rating.
On the bottle it says 'A silky-smooth hand and body lotion that quickly absorbs into the skin leaving a soft, satin feel and a light almond fragrance. Contains a whipped blend of jojoba oil and vitamin E.'
Silky-smooth and quickly absorbed it certainly is!
I am very fussy when it comes to hand products. I hate anything that I can feel on the skin for too long, it makes me want to go and wash my hands and as I usually apply my hand creams straight after washing my hands this leads to a slightly ridiculous cycle.
This one is perfect though, one pump dispenses just the right amount and it sinks in quickly leaving my hands feeling soft and smooth with no slimy residue!
The scent is yummy, it smells almost exactly like Mr Kipling Almond Slices. It's not at all overpowering and once on the hands I can barely detect it at all which I like because I'm not so keen on anything too strong smelling on my hands.
Ingredients are as follows - Aqua (Water) (Eau), Cetearyl Alcohol, Simmondsia
Chinensis (Jojoba) Seed Oil, Dimethicone, Helianthus
Annuus (Sunflower) Seed Oil, Glycerin, Isopropyl Myristate,
Glyceryl Stearate, PEG-100 Stearate, Tocopheryl Acetate,
Panthenol, PPG-3 Benzyl Ether Myristate, Ceteareth-20,
Tetrasodium EDTA, Parfum (Fragrance), Methylparaben,
Propylparaben, Butylparaben, Ethylparaben,
Phenoxyethanol, Isobutylparaben, CI 19140 (Yellow 5).

So there are my three must have hand and nail products!
There are a few other tools and products I use when doing my nails but none that I have much of a preference on type or brand but if you would like to see what else I use or a post about my manicure routine from start to finish let me know and I will be happy to oblige!

♥ A ♥


Monday, 23 July 2012

Barry M - Silver Multi Glitter

Today I have another of the new Barry M glitter polishes to show you.

Silver Multi Glitter is another densely packed micro glitter in a clear base much like Pink Silver Glitter.
But whilst it is mostly silver there are tiny little specks of colour in there which are pretty tricky to see.
 I definitely saw a bright pink, red, turquoise and yellow before I went cross eyed trying to focus but there may well be more!


When on the nail it appears mostly silver but mix of other colours give it a subtle sparkle which is really pretty.


Again like Pink Silver Glitter I was happy at two coats.
It applied evenly without any dragging or rearranging of glitter and dried to the usually grainy glitter finish, which is easily rectified with a couple of layers of topcoat. My photos show it without.


I like this polish a lot.
It's another understated glitter polish but the mix of colour gives it a really pretty edge making it interesting and unique.

♥ A ♥ 

Tuesday, 17 July 2012

Barry M - Pink Silver Glitter


I have another Barry M glitter to show you today.
Pink Silver Glitter is exactly what it says it is. Pink and Silver glitter.


This one is a mix of rose pink and silver micro glitter which is densely packed in a clear base.
It's a little too dense to be a topcoat, but why would you want it to be? Two coats and look how pretty it is! However I am looking at these pictures now and thinking why didn't I add a third coat, in person I was happy with two.

I love how understated this is for a full on glitter polish.
Another perfect day to night polish from Barry M.

♥ A ♥

Saturday, 14 July 2012

Barry M - Magenta Glitter

Barry M Magenta Glitter is a Superdrug exclusive.
It is similar to Aqua Glitter in that it has two sizes of glitter. However, unlike Aqua Glitter the larger glitter doesn't stand out quite as much after more than one coat.
That's not necessarily a negative point, merely an observation worth making.
I still think it is a stunner. 


Again, like Aqua Glitter, one coat will make a very pretty topcoat to jazz up a more ordinary polish.


I stopped at three coats even though it wasn't fully opaque, a forth would have done it but I was afraid of losing sight of those hex glitters altogether.


  Application was nice and easy, it went on evenly so no having to faff around arranging the glitter. Always a plus point, I think you'll agree! And I adore the colour, I'd say it's a more dark magenta, but magenta none the less. It will look gorgeous layered over a nice turquoise or teal to contrast against. I already have some combinations I want to try out with this one so you can expect to see it popping up again on here in the near future! 

♥ A ♥


LinkWithin

Related Posts Plugin for WordPress, Blogger...