Showing posts with label China Glaze. Show all posts

Friday, 24 May 2013

Neon 80's Nails - Nail Art

First of all I'd like to apologise for my absence yesterday, my internet disappeared off for a day and I hadn't yet scheduled the post I had planned. It's just as well really as I have decided to take a slightly different route with it so now I have the weekend to tweek a few things ready for next week!

Anyway, today I have some 80's/90's style nails for you.
They weren't intended to be 80's/90's it just happened that way, but I really liked them anyway.


I used Barry M Matt White as the base then taped off random triangles with normal cellotape and used China Glaze Hang-Ten Toes and Surfin' For Boys on alternate nails. When that was dry I taped off the lines and used Barry M Black. I felt it needed a bit of sparkle so I added some silver Glequins from the Born Pretty Store (review HERE) and finished with a coat of Seche Vite.

 Like I said, I never intended for them to have an 80's/90's feel at all. It started as an abstract colour blocking idea I had but I just love the way it turned out. They remind me a bit of the Misfits from Jem and the Holograms!

♥ A ♥

Wednesday, 22 May 2013

Rainbows, Gradients and Studs - Nail Art

Today I have more neon and more studs for you so I hope you're not bored of them yet!
This was one of those designs that popped into my head when I was supposed to be asleep, that happen to anyone else? And all you can think about is going and painting your nails?
It happens to me often.


For this I used a base of Barry M Matt White, left it to dry then taped off half the nail on my middle, ring finger and thumb. Then did a sponge gradient (tutorial HERE) using China Glaze Splish Splash, Sun-Kissed and Love's A Beach. After that had dried I applied Barry M All In One Top coat, Base coat and Nail Hardener and stuck the studs (review HERE, purchase HERE) on while that was still wet then finished with a coat of Seche Vite.

I was quite pleased how they turned out, they made me feel super summery, which is a shame really as it started to rain shortly after I finished them!

♥ A ♥

Monday, 20 May 2013

Neon Candy Stripes - Nail Art

I feel like I should warn you that I have three nail art posts this week that all include neon polish.
The sun comes out, I get excited, out comes the neon!

Todays post, as the title would suggest, is neon candy stripes.
I was going to call them rainbow stripes but when I posted a picture of these on my personal Facebook page I had several people tell me they reminded them of Candy Crush.
That game is taking over the world.


I used Barry M Matt White as a base then used striping tape to mark out my stripes. Then with a nail art brush I applied China Glaze Surfin' For Boys, Orange You Hot?, Sun-Kissed, I'm With The Life Guard, Splish Splash, Love's A Beach, and Beach Cruise-R.

I can't explain how happy this mani made me.
The lines, the rainbow, the neon .... <3

Does it remind anyone else of Candy Crush?

♥ A ♥

Friday, 17 May 2013

Inspired by... - Graffiti Nails

Quite a while ago now I came across this video by Algae Veronica on YouTube and absolutely loved it.
I knew I wanted to have a go at something similar but just never got round to it until recently!


I decided to start with a base of Barry M Matt White.
Then I used Splish Splash, Love's A Beach, Orange You Hot?, Beach Cruise-R, Sun-Kissed and I'm With The Lifeguard from the China Glaze Summer Neon 2012 Collection to create the sponged gradients in the corners. I then used Barry M Black with a fine nail art brush to free hand the explosions.

I loved wearing these, they made me happy every time I looked down at my nails!

If you want to see more of Algae Veronicas amazing nail designs then you can find her in the following places.


♥ A ♥

Friday, 23 November 2012

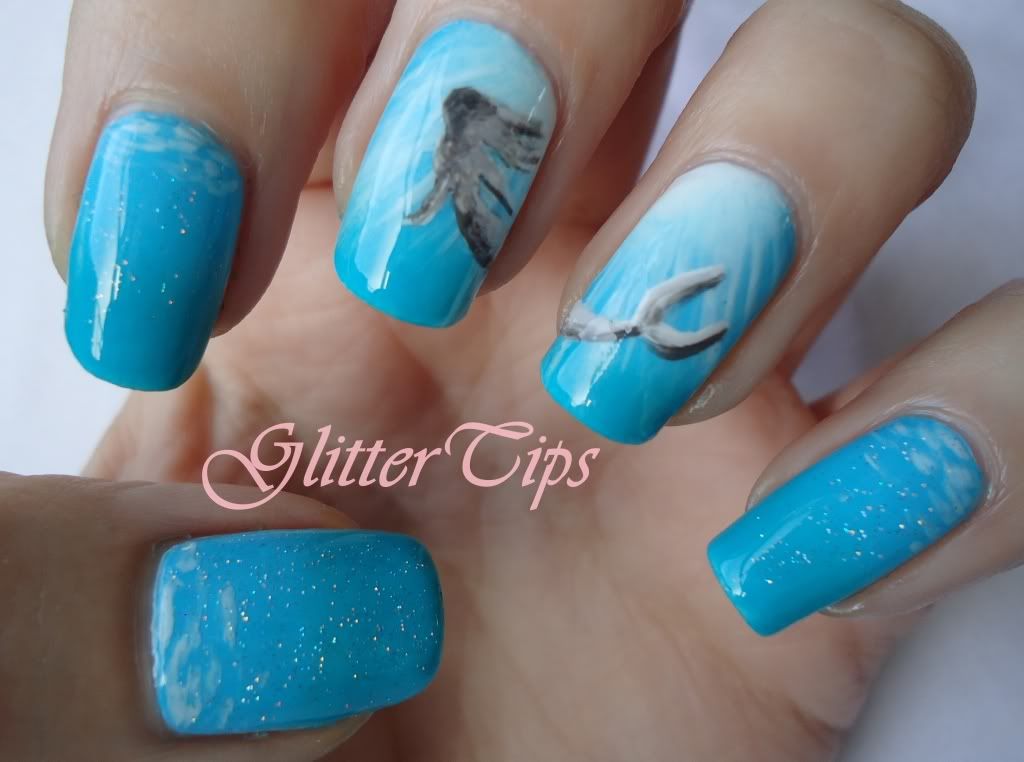
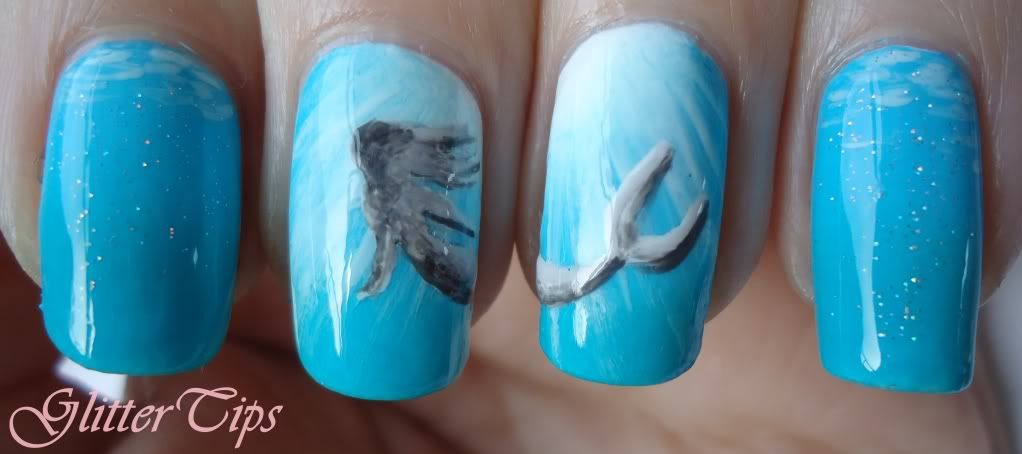
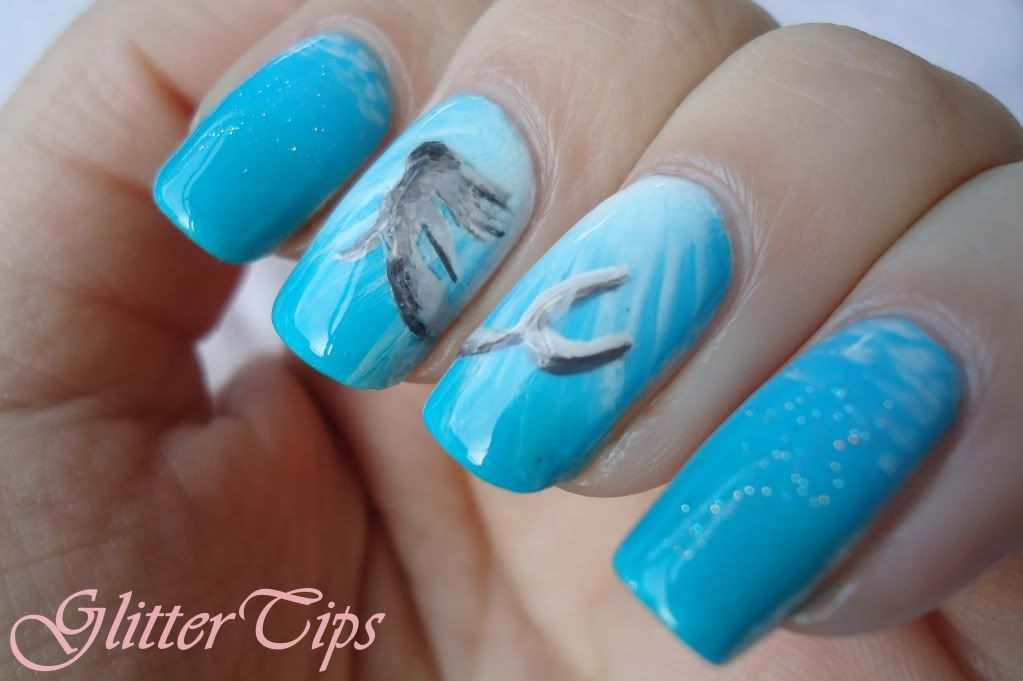
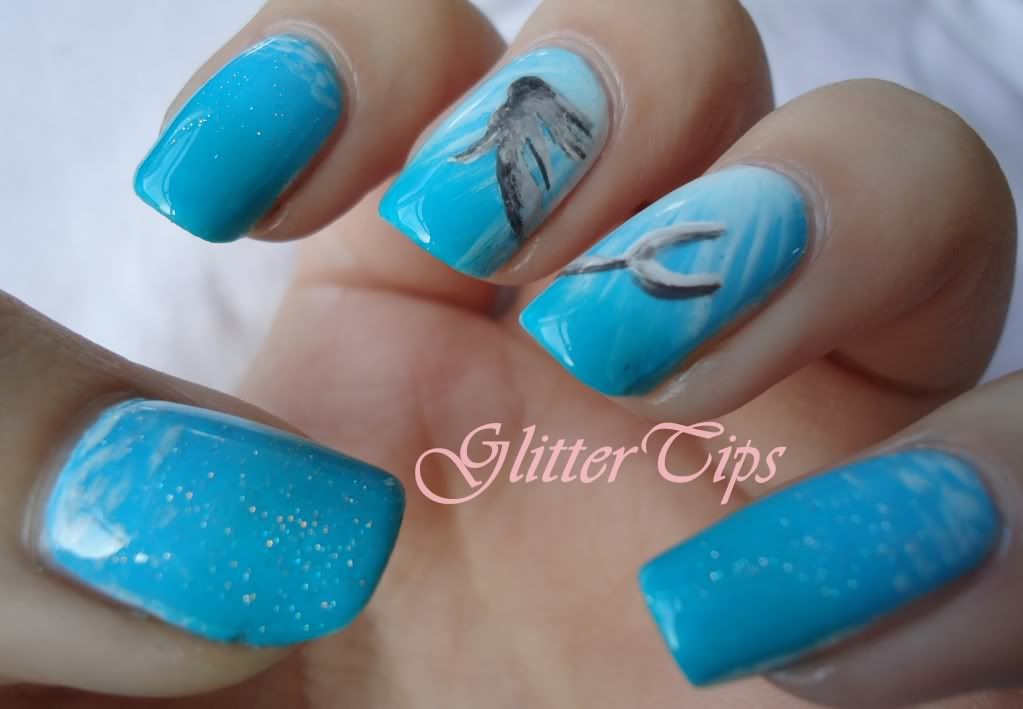
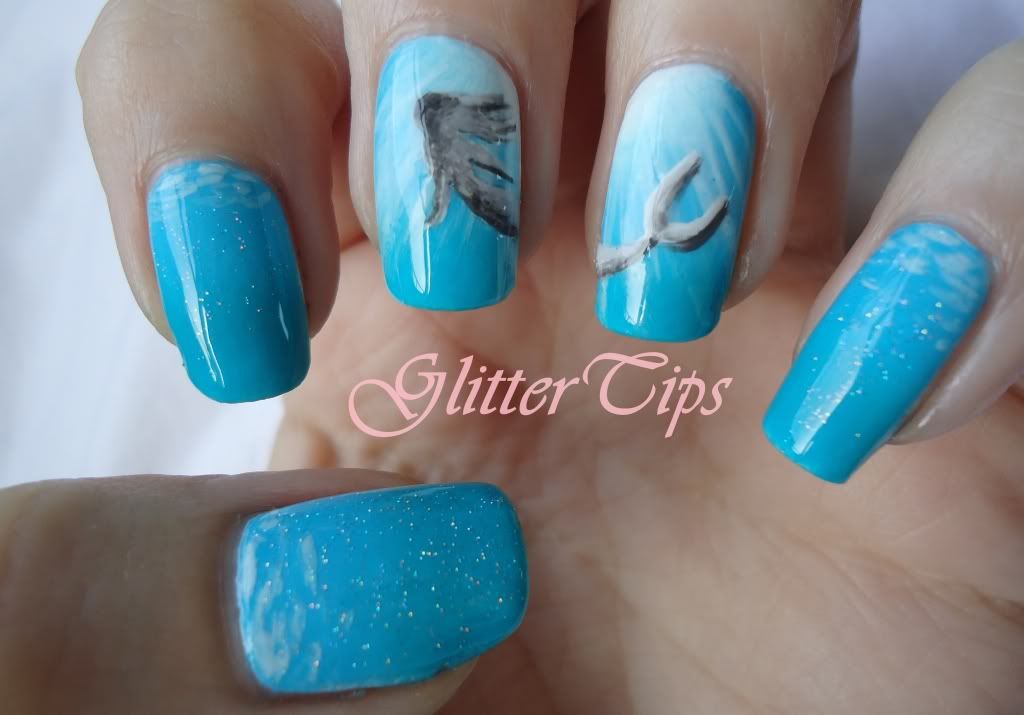
Lazy 15 Nail Challenge - Day 10 Underwater Creatures/Mythical Water Creatures

Today is day 10 of the Lazy 15 Challenge and the theme is Underwater/Mythical Underwater Creatures.
I knew as soon as I saw it I was going to do mermaid nails. I toyed with the idea of octopus/kracken nails, but I just kept coming back to mermaids.


I wanted to give the effect of looking up from under the water at the mermaid against the light, as if she was spotted by some scuba divers or something. I'm fairly certain I'm not describing it very well but hopefully you catch my drift!

I started by applying a gradient over a base of Barry M Matt White.
For the gradient I used a piece of kitchen sponge as usual. On the ring and middle fingers I added Barry M Matt White to the top right/left corners then Barry M Pure Turquoise and Rimmel London 60 Second Nail Polish in Sky High which is a bright teal.
On the pinky, index and thumb I just did a normal gradient of the Pure Turquoise and Sky High.
When that had dried, I mixed a little Pure Turquoise and Matt White and used it on the two middle fingers lightly with a bit of acetone to make the lights rays coming through the water, then roughly at the top of the other three nails to look like light reflecting off the surface of the water.
Next I did the shape of the mermaid in Matt White, then mixed Matt White, Grey and Black, all by Barry M, to do the shading.
To finish I used China Glaze Fairy Dust on the pinky, index and thumb for a little sparkle then topcoated with Seche Vite.

Unfortunately the greeny teal shade of Sky High doesn't show up in the photos, which is a pain as it gives a bit of depth. But other than that I am in love with this one, I'd totally keep it on all weekend if I wasn't going out tomorrow evening!

Hope you all have a fab weekend!

♥ A ♥

Monday, 5 November 2012

The Lazy 15 Challenge - Day 2 Gradient

I do love a gradient, and to me there's no better gradient than a nice bright neon one!
So for todays challenge I broke the China Glaze Summer Neons out once again.


I love how this turned out and I love having some bright colours on my finger nails again too!
I used China Glaze Hang-Ten Toes as a base then sponged on Orange You Hot?, Surfin' For Boys, Hang-Ten Toes and Beach Cruise-R for the gradient.

Next up is Dots!


♥ A ♥


Saturday, 18 August 2012

31 Day Nail Challenge - Day 13 - Animal Print

I'd just like to say first of all a huge thank you to anyone who has voted for my nails so far in the Makeup Savvy Challenge!
My Tangled nails were picked as one of Fee's three favorites and I am absolutely thrilled! Although they are not my favorites from the challenge they were the ones which were the most challenging for me took the longest, a good three hours was spent on them! So for anyone else to see the effort it took is a huge compliment!

Now the challenge is over I can get back to the 31 Day Nail Challenge I was plodding my way through.
I am now on Day 13 which is Animal Print.


I have done these nails before but as I wasn't blogging back then I only have a crappy phone pic of them, so I decided to recreate them for today's challenge.

I used 2 coats of Barry M Matt White as a base then Barry M Pure Turquoise and Shocking Pink for the gradient. For the middle of the leopard spots I used China Glaze Beach Cruise-R and Spilsh Splash then Barry M Black for the outside and Zebra Stripes. Then I added a bit of Models Own Juicy Jules through the stripes for a bit of sparkle.

♥ A ♥ 

Tuesday, 14 August 2012

Makeup Savvy 15 Day Nail Challenge - Day 14 - Dots

Today's challenge is dots.
I've had some appointments to go to today so I just wanted something that was quick, simple and bright!


I'm still in love with my China Glaze Neons.
Today I used two coats of Barry M Matt White and China Glaze Loves A Beach, Orange You Hot?, Sun-Kissed, I'm With The Lifeguard, Splish Splash and Beach Cruise-R.

Just looking at them makes me want to go jump in a ball pool!

Tomorrow is the last day of the challenge and the theme is anything!

♥ A ♥ 


Tuesday, 7 August 2012

Makeup Savvy 15 Day Nail Challenge - Day 7 - Neon

Today the theme for the Makeup Savvy 15 Day Nail Challenge is Neon. 
I like neon. A lot. Almost as much as I like glitter!
I had loads of different ideas I wanted to try for today and I just couldn't choose so I decided I'd do 'ALL THE THINGS!!' And this is what happened.


I just love how these turned out!
As I had decided to go mad with the design I kept it to just three of my neon colours, trust me I did get all seven of them out but decided I was crossing a line, so put four back.
The colours chosen are all China Glaze from the Summer Neon Collection.
The pink is Love's A Beach, green is I'm With The Lifeguard and the yellow is Sun-Kissed.
Then I just used Barry M Black and a nameless White for the details.
I hope you like!

♥ A ♥ 

Saturday, 4 August 2012

Makeup Savvy 15 Day Nail Challenge - Day 4 - Galaxy

It's day 4 of the Makeup Savvy 15 Day Nail Challenge and I am really enjoying it!
Todays challenge was Galaxy Nails, another nail trend I was yet to try. Every time I saw another amazing galaxy nail on Pinterest, YouTube or Blogs I just thought I would end up in a blobby mess of glitter and colour. But I cannot tell you enough how easy these are to do!


I started off with one coat of Barry M Black Multi Glitter, then I tore small chunks off a kitchen sponge and used a White polish to sponge on the general shape I wanted for each 'Galaxy'.
Then on my Index and Ring fingers I sponged on Missguided Misslead and Nails Inc New Burlington Place. On the Thumb and Pinky I used Barry M Berry Ice Cream and Accessorize Purple Dream, then lastly for the Middle finger I used Barry M Blueberry Ice Cream, Navy and Models Own Aqua Violet from the Beetle Juice collection.
Once all that was dry I used my smallest dotting tool and White polish to do some clusters of small starts then a slightly larger dotting tool to do a few larger stars, then with a fine nail art brush I picked one larger star on each nail to be my shining star and added some starburst lines. Then finally I used a tiny bit of China Glaze Fairy Dust and sponged it on to fill in some of the gaps.

A lot of different colours I know but only a tiny bit of each was used and it was so quick to do!

I am so pleased with how these turned out and an added bonus, even Mr GT stopped, put down the Xbox controller and said 'They are awesome' then went back to his game.
Now that's a compliment!

♥ A ♥ 

LinkWithin

Related Posts Plugin for WordPress, Blogger...