Friday 24 May 2013

Neon 80's Nails - Nail Art

First of all I'd like to apologise for my absence yesterday, my internet disappeared off for a day and I hadn't yet scheduled the post I had planned. It's just as well really as I have decided to take a slightly different route with it so now I have the weekend to tweek a few things ready for next week!

Anyway, today I have some 80's/90's style nails for you.
They weren't intended to be 80's/90's it just happened that way, but I really liked them anyway.


I used Barry M Matt White as the base then taped off random triangles with normal cellotape and used China Glaze Hang-Ten Toes and Surfin' For Boys on alternate nails. When that was dry I taped off the lines and used Barry M Black. I felt it needed a bit of sparkle so I added some silver Glequins from the Born Pretty Store (review HERE) and finished with a coat of Seche Vite.

 Like I said, I never intended for them to have an 80's/90's feel at all. It started as an abstract colour blocking idea I had but I just love the way it turned out. They remind me a bit of the Misfits from Jem and the Holograms!

♥ A ♥

Wednesday 22 May 2013

Rainbows, Gradients and Studs - Nail Art

Today I have more neon and more studs for you so I hope you're not bored of them yet!
This was one of those designs that popped into my head when I was supposed to be asleep, that happen to anyone else? And all you can think about is going and painting your nails?
It happens to me often.


For this I used a base of Barry M Matt White, left it to dry then taped off half the nail on my middle, ring finger and thumb. Then did a sponge gradient (tutorial HERE) using China Glaze Splish Splash, Sun-Kissed and Love's A Beach. After that had dried I applied Barry M All In One Top coat, Base coat and Nail Hardener and stuck the studs (review HERE, purchase HERE) on while that was still wet then finished with a coat of Seche Vite.

I was quite pleased how they turned out, they made me feel super summery, which is a shame really as it started to rain shortly after I finished them!

♥ A ♥

Tuesday 21 May 2013

Sponge Gradient - Tutorial

I have put this off far too long!
I've finally done a photo tutorial on how I do a sponge gradient.
It's no different to any other sponge gradient tutorial I'm sure but I did promise one then promptly forgot!
Better late than never though :-)


You will need-
White nail polish for your base.
Two or more polishes of your choosing.
A piece of kitchen sponge.
Acetone.
Clean up brush/cotton buds.

First of all I'll just say that the type of sponge I use is the yellow ones with the green scouring pad on the top, I just cut off the yellow sponge then cut that into roughly eight smaller pieces.


Step 1 - Apply a base of your white polish and let it dry.
Step 2 - Dampen your piece of sponge, then paint you chosen colours onto the sponge.
Step 3 - Dab the sponge onto the nail.
Step 4 - Keep dabbing while moving the sponge up and down the nail slightly ensuring you cover the whole nail and creating a blend between the colours. Leave to dry for a couple of minutes.
Step 5 - Repeat Step 4 to get a more even coverage and better colour pay off.
Step 6 - Clean up around the nail and finish with your chosen top coat.

If I'm not using the gradient for a base for nail art then I like to add a coat of China Glaze Fairy Dust over the top to give it a bit of sparkle which is what I have done in the photos below.


I hope that was easy enough to follow!? 
I am going to make an effort to do more tutorials for you, the reason why I haven't before is because usually I don't know what I'm going to do when I sit down to do my nails so it doesn't occur to me to stop and take a photo at each stage. I think my best bet is to do video tutorials but that involves a new camera and learning how to edit which quite frankly terrifies me, but I am looking into it!
In the mean time if there are any other tutorials you would like me to attempt here on the blog then let me know, I will certainly give it a whirl!

♥ A ♥

Monday 20 May 2013

Neon Candy Stripes - Nail Art

I feel like I should warn you that I have three nail art posts this week that all include neon polish.
The sun comes out, I get excited, out comes the neon!

Todays post, as the title would suggest, is neon candy stripes.
I was going to call them rainbow stripes but when I posted a picture of these on my personal Facebook page I had several people tell me they reminded them of Candy Crush.
That game is taking over the world.


I used Barry M Matt White as a base then used striping tape to mark out my stripes. Then with a nail art brush I applied China Glaze Surfin' For Boys, Orange You Hot?, Sun-Kissed, I'm With The Life Guard, Splish Splash, Love's A Beach, and Beach Cruise-R.

I can't explain how happy this mani made me.
The lines, the rainbow, the neon .... <3

Does it remind anyone else of Candy Crush?

♥ A ♥

Friday 17 May 2013

Inspired by... - Graffiti Nails

Quite a while ago now I came across this video by Algae Veronica on YouTube and absolutely loved it.
I knew I wanted to have a go at something similar but just never got round to it until recently!


I decided to start with a base of Barry M Matt White.
Then I used Splish Splash, Love's A Beach, Orange You Hot?, Beach Cruise-R, Sun-Kissed and I'm With The Lifeguard from the China Glaze Summer Neon 2012 Collection to create the sponged gradients in the corners. I then used Barry M Black with a fine nail art brush to free hand the explosions.

I loved wearing these, they made me happy every time I looked down at my nails!

If you want to see more of Algae Veronicas amazing nail designs then you can find her in the following places.


♥ A ♥

Thursday 16 May 2013

Where I do my nails

Call me nosey, but I love to see where fellow bloggers and nail enthusiasts paint their nails and blog from. So as I recently cleared a corner of my dining room and claimed it as my nail corner I thought I'd show you my new nail space!


My desk is Ikeas Besta Desk Combination in white.
I chose this one as I liked the size, shelf space and that it had the option to wall mount the shelves if prefered.
Even with my laptop and lamp there is still plenty of room for me to do my nails and everything is at hand, couldn't as for much more than that really!
I also like that my Hetty Helmer fits nicely underneath, it's not a perfect fit but it's good enough for me!

Moving on to a closer look at what is on my desk/shelves.


I bought an acrylic nail polish display stand from eBay for £9.50 (HERE) to neatly store some of my most used nail polishes on rather than keeping them in Hetty.
The back row has my Barry M Black and Matt White polishes, a random white, a Models Own, Barry M and Seche Vite Top Coat, No7 Matte Top Coat, OPI Matte Nail Envy and my CND Solar Oil.
The middle row has the China Glaze Summer Neon 2012 Collection because I have been using them a lot recently what with the odd sunny day we have had!
Then on the front row I have four OPI polishes I bought from Fragrance Direct for £3.99 each that I have yet to try. The colour are I'm All Ears, I Don't Give A Rotterdam, Dutch 'Ya Just Love OPI, and If You Moust You Moust.


On the next shelf up I have my note pad, The WAH Nails Book of Nail Art, the Nail Art Sourcebook, and my little monkey nail dryer! I also keep my camera and my memory stick dongle up here too.

My top right shelf is home to my bottle of acetone, nail polish remover and two glass pots, which used to have candles in, holding my nail art/care tools.
The middle shelf on the right is currently empty as that is where I now take my photos!


There is always my favorite cup with tea/coffee present, usually accompanied by some sort of biscuit, and I'm not going to lie most of the time there is some sort of lego or felt tips pens scattered about too from the Mini Tips.

And this post wouldn't be complete without showing you a very important addition to my nail space. If I am at my desk you can guarantee this little face is sat just behind me in my chair ...


... lying to me about not being fed yet.

♥ A ♥

Wednesday 15 May 2013

Studded Spring Floral - Nail Art

If you follow me on Instagram then you may have already seen todays nails.
The sun had put me a in a Spring mood but I wasn't ready to stop playing with the Nail Studs so I decided to try a studded floral design.


I used two coats of Barry M Matt White as a base then used some paper hole reinforcer stickers to mark off the half moons on my pinky and index fingers and used Barry M Black with a fine nail art brush to freehand the stripes. On my thumb, middle and ring fingers I used Barry M Baby Pink and Lemon Ice Cream with a nail art brush to randomly add some petal shapes and Barry M Black again for the 'stalks'. I then gave all five nails a coat of China Glaze No Chip Top Coat and applied the studs whilst that was still wet. When that had dried I finished with another layer of top coat.

I loved these, I liked the mix of delicate pink and yellow floral with bold stripes and studs, I thought they worked nicely together. I think it will looks equally as good using some brighter colours for the flowers, maybe red and fuchsia.

Let me know what you think!

♥ A ♥

Tuesday 14 May 2013

Born Pretty Store - Wax Rhinestone Picker Pencil

I have another Born Pretty Store review for you today.
At the same time as I received the Nail Stud Wheel I reviewed yesterday I also received two white wax pencils.


You probably have a fair idea of what these are used for but for those of you who don't, no I have not lost my mind, and yes this is nail art related.


They are used for picking up rhinestones/studs/glequins/etc and placing them on the nail.
I used to use an orange stick dipped in clear nail polish to pick these fiddly things up and while that did work fine, I much prefer using the wax pencil.


These make short, mess free work of picking up and individually placing glequins etc, so if the thought of spending several frustrating hours faffing around with rhinestones puts you off experimenting with them then I highly recommend trying these out. They'll last you a while and are a great basic to have in your nail art arsenal.
You get two for $1.99 HERE with free worldwide shipping. you can also use the code QPL91 for 10% off anytime.


♥ A ♥

Monday 13 May 2013

Born Pretty Store - Nail Stud Wheel Review

Hey!
Sorry to have been gone so long.
I took a bit of an unexpected break from blogging for a few reasons, just one of which being that all my nails decided they were going to break off and look terrible so I needed to give them a bit of a break. I took the time off to work on a couple of other things too but now my nails are back in fighting form I am so glad to be able to do my nails and blog again.

Today I have a review for you.
A while back I received this Nail Stud Wheel from the Born Pretty Store to review.


I love anything with studs so I could not wait to experiment with these!
As you can see there are 12 sections each holding a different stud making it ideal if you are yet to try nail studs. There are plenty to play with in each section, and I love that there is a mix of Gold, Silver and Black studs in there along with different sizes and shapes.

I wanted to do something to show as many of the different types of studs as I could get away with in one design and here's what I came up with.


I used Barry M Gelly Effect Lychee and Barry M Black for the nail art then applied a coat of Barry M All In One Basecoat/Topcoat/Nail Hardener over the top and applied the studs while that was still wet. Once they were all in place I let them dry for a little while then finished with a coat of China Glaze No-Chip Top Coat.

The studs lie quite flat to the nail and aren't too big which helps them last longer on the nail without catching on anything, mine lasted a full three days before I lost the first stud.
I have been so impressed with this little wheel of wonder that I have used studs in almost every design I've done since they arrived, so expect to see a lot more of them!

You can buy your own Nail Stud Wheel on the Born Pretty Store website HERE for $4.89 plus free worldwide shipping and you can use the code QPL91 anytime for 10% off.


♥ A ♥

Thursday 14 February 2013

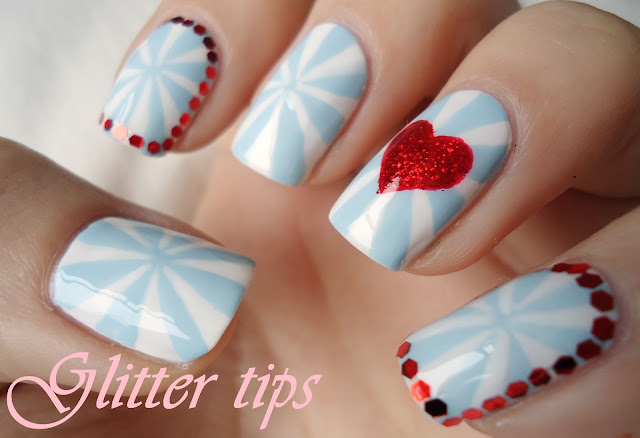
Valentines - Nail Art

Today is Valentines Day and I have to say I am not much of a fan.
But I have made somewhat of an effort and put a heart on one of my nails so I thought I'd show you!


For these I started with two coats of Barry M Matt White and used Avon Nailwear Pro Vintage Blue to make the umbrella/pinwheel pattern.
It's quite tricky to try and explain clearly how I did it but I'll give it a go.
I started with a really small dot roughly in the center of my nail, and made a line with the blue polish from the dot to the edge of my nail, I then made another line from the dot to the side of my nail so I had a quarter marked out. I then divided that quarter into four and painted two of those sections with the blue and repeated for the other three quarters.
If that makes as little sense as I think it does let me know and I'll make a tutorial!

For the heart I used China Glaze Igniting Love and Barry M Red Glitter then just framed the pinky and index fingers with red Glequins!

I like it, it's not too Valentines-y but shows that I'm aware of the date and that I'm not a completely bitter married just yet ;-) I suppose you could make it a bit more valentines appropriate by using reds and/or pinks instead of blue and white but I really like theses colours together, it's a combo I'll be sure to use again.

Hope you are all have a good day!

♥ A ♥

LinkWithin

Related Posts Plugin for WordPress, Blogger...