Thursday, 14 February 2013

Valentines - Nail Art

Today is Valentines Day and I have to say I am not much of a fan.
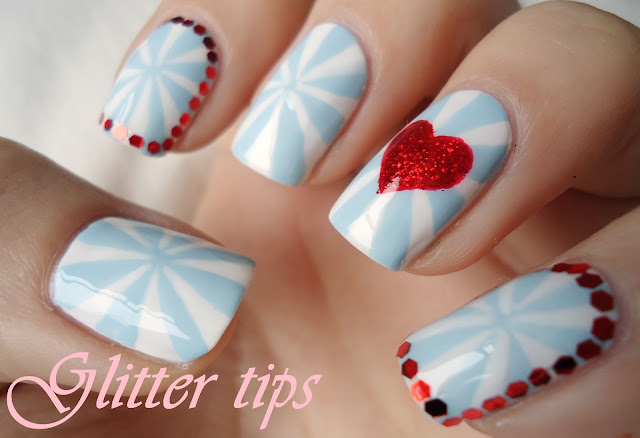
But I have made somewhat of an effort and put a heart on one of my nails so I thought I'd show you!


For these I started with two coats of Barry M Matt White and used Avon Nailwear Pro Vintage Blue to make the umbrella/pinwheel pattern.
It's quite tricky to try and explain clearly how I did it but I'll give it a go.
I started with a really small dot roughly in the center of my nail, and made a line with the blue polish from the dot to the edge of my nail, I then made another line from the dot to the side of my nail so I had a quarter marked out. I then divided that quarter into four and painted two of those sections with the blue and repeated for the other three quarters.
If that makes as little sense as I think it does let me know and I'll make a tutorial!

For the heart I used China Glaze Igniting Love and Barry M Red Glitter then just framed the pinky and index fingers with red Glequins!

I like it, it's not too Valentines-y but shows that I'm aware of the date and that I'm not a completely bitter married just yet ;-) I suppose you could make it a bit more valentines appropriate by using reds and/or pinks instead of blue and white but I really like theses colours together, it's a combo I'll be sure to use again.

Hope you are all have a good day!

♥ A ♥

Thursday, 7 February 2013

Leopard Print & Half Moons - Nail Art

Here is my nail art post that was supposed to go up yesterday but then I fell asleep! Whoops!

I was inspired by this Pin I have on my Nail Inspiration Board on Pinterest.
Unfortunately after spending most of the morning and the afternoon up until now searching I cannot find where the original image came from to link back to, so if anyone knows please let me know so I can add the link.

*Edited to add link - HERE*


For these I started with two coats of Barry M Black on the Thumb, Middle and Ring fingers and two coats of OPI Skull & Glossbones on the Index and Pinky. I then free handed the half moons with Barry M Black and used  Models Own Bronze Rage and Barry M Black again for the leopard print. I added the Swarovski Crystals (HERE) on to a wet layer of China Glaze No Chip Top Coat and then finished the all black nails with a coat of Seche Vite. I didn't topcoat over the crystals as I didn't want them to lose their sparkle but they are still going strong 24hrs later!

♥ A ♥

Wednesday, 6 February 2013

2True Glitterati Nail Polish - Swatch and Review

This post was scheduled to go up yesterday evening but Blogger decided that was far too much to ask and didn't post it at all! So today you will have two posts from me.


Today I have the 2True Glitterati nail polish in Shade 1.
2True isn't a brand I have paid much attention to in the past, I have seen their stand in Superdrug but nothing had ever really caught my attention enough for me to stop and have a proper look but the other day when I was having a nosey this little beauty caught my eye.

It is a aqua blue jelly base which has fine glitter in addition to silver and iridescent blue/green hex glitters. Two coats give good coverage however you can still see the nail line so I tried it layered over Barry M Cyan Blue below.


I found the polish it self to be quite gloopy and difficult to control so if you are quite picky about the line at the cuticle being neat I recommend an under layer of a similar colour polish, but other than that I am in love.

You can buy 2True products in Superdrug, this polish was around £2.

♥ A ♥

Monday, 4 February 2013

Camouflage - Nail Art

Happy Monday to you all, I hope everyone has had a good start to their week!
Today I have some nail art for you that was inspired by a YouTube video by Love4Nails.
Back in November Love4Nails uploaded a Camouflage Nail Art Design Tutorial.
I loved the design and the colours she used together, however my nails are a lot shorter than hers so I had to adapt the design a bit. Instead of doing a camouflage french, I did a mix of half moons and full nails.


I love these so much!
I used two coats of OPI Skull & Glossbones as my base colour then started with large, random blobs of  Models Own Bronze Rage. For the green I mixed Barry M Lime Green, Mint Green, Spring Green and Mushroom and applied that randomly again overlapping slightly on some of the bronze, then I used Barry M Black for the smaller blobs. Finally I added Barry M Green Glitter over the top of the green and a coat of Seche Vite to finish.
Then I got curious and for the first time in quite a while I went and got my No7 Stay Perfect Matte Topcoat to see what it looked like matte.


I like it, but much prefer it glossy!
What do you think?

♥ A ♥

Friday, 1 February 2013

Glitter Tips Gleeq Week - Day 5


Today is Day 5 and the final day of Gleeq Week!
I wanted to do something a little softer today so I went for a pale pink base and the light gold Glequins.


I'm not sure how well you can see it, but it's supposed to be a bow.
I started with the bow on the ring finger then made the ribbon ends loop and trail across the rest of the nails.
The base colour is two coats of Barry M Baby Pink over two coats of Matt White.

You can purchase the set of Glequins I have been using this week from the Born Pretty Store HERE for $6.45 with free delivery. Don't forget to use the code QPL91 to get 10% off your order. The code will remain up in my sidebar for you to use anytime you might want to make a Born Pretty Store order!

I hope you have enjoyed Gleeq Week and it has given you some ideas of how Glequins can be used, I have had so much fun playing with them this week that they have become a firm favourite and a staple in my nail art draw! I will most definitely be reaching for them regularly.

♥ A ♥

LinkWithin

Related Posts Plugin for WordPress, Blogger...